IoT Saga - Part 5 - The two way communication bridge: Presenting the Bitfrost
Hello, today I will present what I’ve been thinking about this application. Well, first of all, I have to explain the reason behind this application. Along the previous posts I’ve shown how I build the base to my dashboard panel using Hanami, Websockets and a MQTT broker, now it’s time to change the subject to start to talk about the application responsible for connect the Arduino world (Mygard) to the Dashboard world (Usgard).
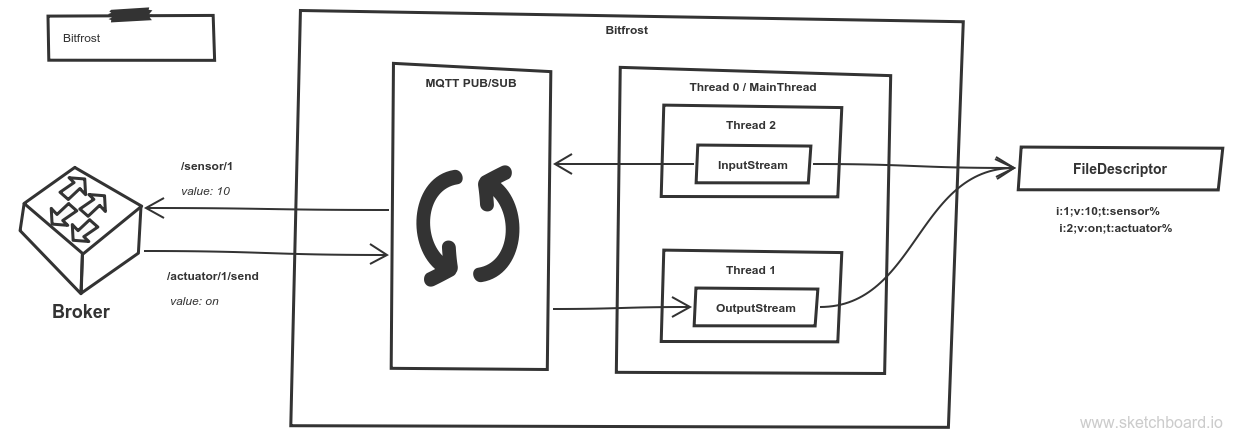
There is a diagram that explains the main idea:

As you can see above, the Bitfrost is a deamon application that runs threads to send and receive messages from MQTT and RXTX. There are many ways to make it possible, I thought that the best way is to use Convention over Configuration and just follow a guide to publish and subscribe channels without configure all of them. I don’t want to change my application.yml everytime that I need to add a new sensor or an actuator, then I think is a good way to solve my problem, at least for now.
After this little introduction (I hope to explain again on the next posts), let’s see something about the input and output of this application.
MQTT Broker
I’m using mosquitto as MQTT broker. This broker is capable to deal with the message’s flux using channels, these channels are like routes or paths where we can put some information (messages). Take a look at the example below.
# Incomming message
MQTT Topic: /actuator/2/send

MQTT message headers: {mqtt_retained=false, mqtt_qos=0, id=78b2dcd1-21d1-9eb1-0bc1-c74c5d238e3b, mqtt_topic=actuator/2/send, mqtt_duplicate=false, timestamp=1502160412777}

MQTT message payload: on
It sounds familiar, isn’t it? Last week I’ve read a post about MQTT and it gave me the basic knowledge to start to think about this application. For now I don’t want to be worried about permissions and abilities for a specific user because, at least for now, it’s only my hobby project. However I think it’s very easy to add this kind of functionality because I can use the user as a level for a channel like ‘user/123/sensor/1’
That’s the way I will handle MQTT messages and channels so let’s take a look how RXTX works.
RXTX
The first question is what and why RXTX. The RXTX it’s a possible way to send and receive bytes through serial or a USB port. I think that’s the main point, but wait why do I intend to use it? I wish to build the whole thing by myself besides that I don’t have a Arduino capable to connect on the Internet by itself, summing up, from my point of view it’s the better way (at least that I found out).
When we open the arduino IDE something like the picture below appears

- The’/dev/ttyACM0’ is the port responsible for send data between our arduino and the computer.
I will not cover all RXTX installation because it’s different depending the Operational System that you are using, but there are a lot of materials covering this installation on Internet. I’m used to use Linux so I’ve used the following tutorial:
- http://rxtx.qbang.org/wiki/index.php/Installation_on_Linux
Sometimes the USB port it’s not available for the RXTX application then there is a ‘workaround’ to solve it:
sudo ln -s /dev/ttyACM0 /dev/ttyS81This command creates a link to the ‘ACM0’ port and makes it always available for the application.
I will stop now, but I hope to write about how connect the Java application to serial on the next post, as soon as possible.
Thanks!
References
- http://www.hivemq.com/blog/mqtt-essentials-part-5-mqtt-topics-best-practices
- http://rxtx.qbang.org/wiki/index.php/Installation_on_Linux
- https://mosquitto.org/