IoT Saga - Part 4 - Publishing and Subscribing through MQTT: Displaying data on dashboard
Hello everyone, Today I will talk about how I’m using the LiteCable/Anycable and MQTT to display data on my dashboard. I made a huge number of changes on my views changing it to use the Materializecss instead bootstrap, however I not going to talk about it, not yet. Well I’ve shown how can we use anycable, but it’s only a battle to reach the illumination. Well, today I’m going to show how I connected the Websocket with the MQTT, If I could tell something now I think would be that it was the easiest part so far, but I can share some details with you. Let’s start with a map and here it is.
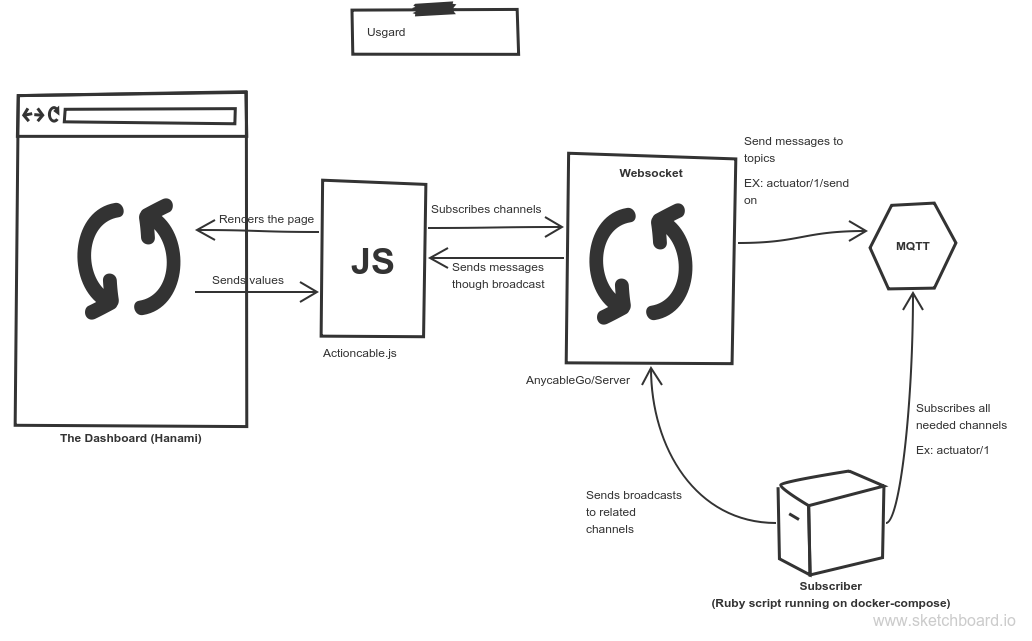
As you could see above there are not only many moving parts but also bidirectional communication ways… Ok I know, but c’mon I added just one part, the MQTT. In the previous post I wrote regarding what is and showed how to use LiteCable, so if you don’t saw the previous post please check it out before continue :).
Now we have a broker that is responsible to handle all connections. The MQTT broker is basically currently my single point of failure, but I’m not worried about it yet, here are some docker stats:

- It’s not a very precise test but I ran a ruby publisher using a sleep time of 0.001 and works well. I tests were made only on my machine
To connect on MQTT I’m using this gem(ruby-mqtt). I simply added the following line to my Gemfile.
gem 'mqtt'After that we have to build not only the code to subscribe all topics needed but also to broadcast messages through websockets to the related channel, I’m using the code below.
require "rack"
require "anycable"
require "litecable"
require "mqtt"
# we must enable the compatibility mode as was made in anycable server file.
LiteCable.anycable!
# Here we have the mqtt connection
client = MQTT::Client.connect(host: 'mqtt', port: 1883)
# Subscribing topics needed
client.subscribe("sensor/#")
client.subscribe("actuator/#")
client.get do |topic, message|
topic = topic.gsub('/', '_')
# Broadcasts to the websockets in a specific channel
LiteCable.broadcast topic, user: 'external', message: message, sid: Random.rand(1..99999)
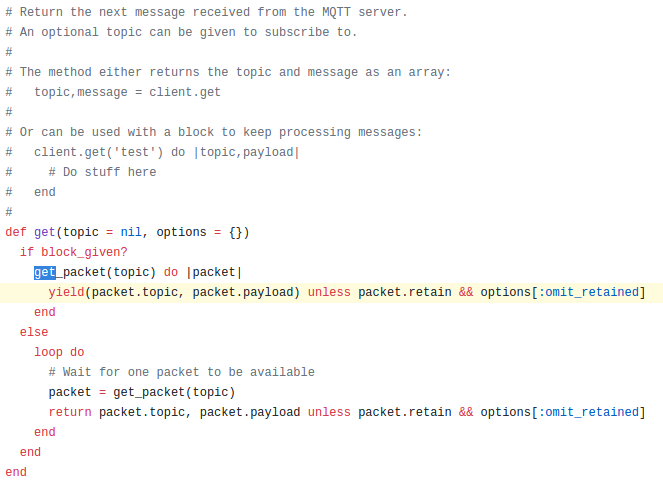
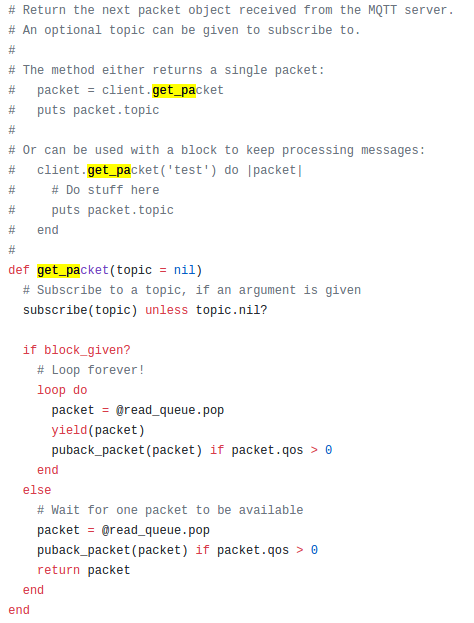
endWell, when we execute ‘client.get’ the execution thread will loop getting packets forever. How I know it? I searched into the gem and discovered how the method ‘get’ works. The code is very well documented then thanks @njh, great work! I printed some pieces of code, so here it is.
And how it gets incoming packets from MQTT topics
As I mentioned previously I’m using docker-compose to separate the responsabilities in little containers avoiding tools like god or systemd on docker. The subscribe script runs as a daemon inside the container, summing up we have to add a new container to docker-compose.yml.
// More code here...
  subscriber:
    build: .
    command: bundle exec ruby subscriber
    volumes:
      - .:/usgard
    env_file:
      - .env.development
    environment:
      - ANYCABLE_REDIS_URL=redis://redis:6379/0
    depends_on:
      - redis
      - db
      - mqtt
Now it works!
Ok, Now we receive data from MQTT on dashboard but on the actuator’s page we have it the following feature:
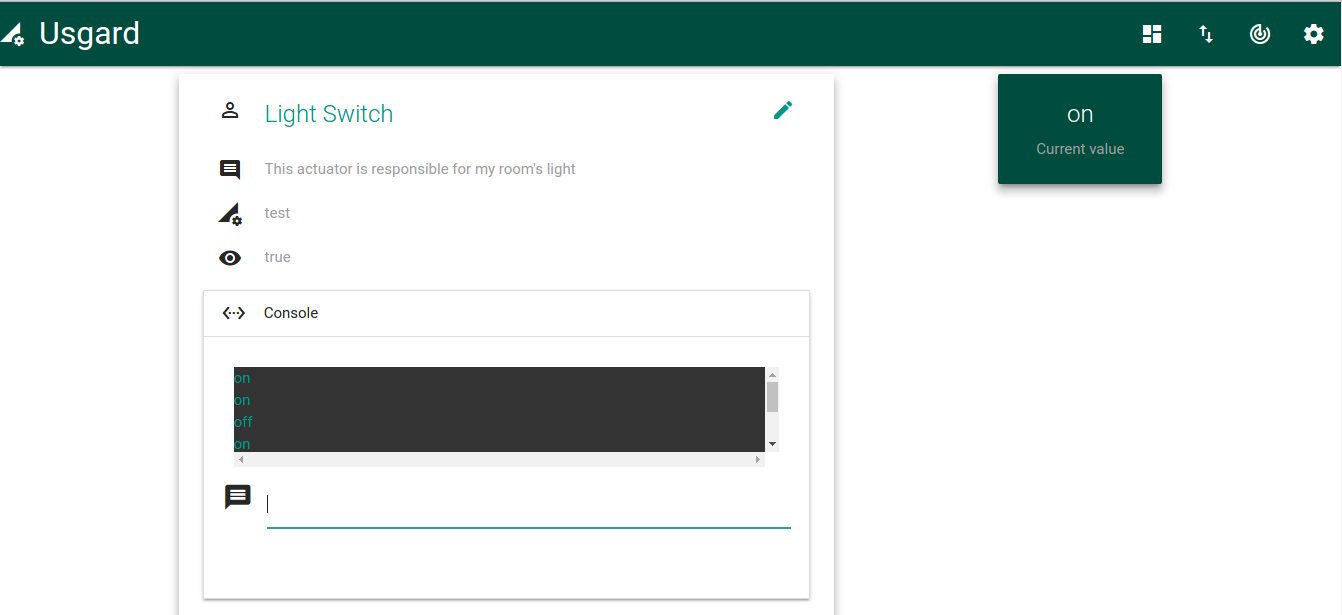
- We have a console, using it we have to send data to actuators
So, how can we send data to an mqtt topic? It’s just send to ‘actuators/1’, isn’t it? Almost there padawan because we don’t want to see the same data that we send. So, when we send data to MQTT we have to use a different topic, for example ‘actuators/1/send’. I already show how connect the websocket with the panel using the litecable channel then we have to change the Actuators channel to send data to MQTT, something like the code below.
# frozen_string_literal: true

module Usgard
  module Ws
    class Channel::Actuator < Usgard::Ws::Channel
      identifier :actuator

      def subscribed
        reject unless actuator_id
        stream_from "actuator_#{actuator_id}"
      end

      def speak(data)
        Hanami::Logger.new.info "#{@user} connected"
        LiteCable.broadcast "actuator_#{actuator_id}", user: user, message: data["message"], sid: sid

        send_to_mqtt(data['message'])
      end

      private

      def send_to_mqtt(message)
        # creates the client connection
        @client ||= MQTT::Client.connect(host: 'mqtt', port: 1883)

        # publishes on actuators output topic
        @client.publish("actuator/#{actuator_id}/send", message)
      end

      def actuator_id
        @actuator_id ||= params.fetch("id")
      end
    end
  end
end
To conclude now the Usgard dashboard is able to receive and send data through MQTT using Websockets. On the next post I will start to talk about both the Bridge, the Bitfrost project, and also about Java, Optionals, Threads and RXTX. I will talk again about Usgard project and Hanami later, don’t worry :) (I maybe write about Vue.js and Rodauth). Thank you, and please give your opinion about it, it makes me happy :).
References
- http://materializecss.com
- https://github.com/njh/ruby-mqtt